Building a Car Dashboard with Raspberry Pi, Waveshare 7" LCD, GPS Module, Bluetooth OBD-II Device, and Qt/QML
With advancements in technology, creating your own car dashboard system is no longer just a dream for tech enthusiasts. Using a Raspberry Pi, a Waveshare 7" LCD, a GPS module, and a Bluetooth OBD-II device, you can develop a powerful system to monitor your car’s performance and navigation. We’ll walk through each step of building a Python-based app integrated with PyOBD, featuring a real-time user interface (UI) built on Qt/QML. The UI will display live navigation and traffic updates using the Google Maps API.
The working prototype video is at https://youtu.be/DSa_0K0RX50
Table of Contents
- Hardware Requirements
- Software and Libraries
- Hardware Setup
- Installing the Software
- Integrating GPS and OBD-II
- Developing the Python Backend with PyOBD
- Creating the UI with Qt/QML
- Google Maps Integration
- Testing and Debugging
- Final Thoughts and Enhancements
- Conclusion
1. Hardware Requirements
To start, you’ll need the following components:
- Raspberry Pi 4 (or newer)
- Waveshare 7" Capacitive Touchscreen LCD
- GPS Module (e.g., NEO-6M)
- Bluetooth OBD-II Scanner
- SD card (32 GB or more)
- Power supply and cables
- Optional: Case for Raspberry Pi and LCD
2. Software and Libraries
The software stack includes:
- Operating System: Raspberry Pi OS (32-bit)
- Python 3: For backend development
- Qt/QML: For creating the graphical UI
- PyOBD: To interface with the OBD-II device
- Google Maps API: For real-time navigation
- Additional Libraries:
pyserial(for serial communication)requests(for API calls)gpsd(for GPS integration)
3. Hardware Setup
Step 1: Connect the LCD to the Raspberry Pi
The Waveshare 7" LCD connects via HDMI and USB. Plug the HDMI cable into the Raspberry Pi and connect the USB cable to enable touch functionality.

Step 2: Attach the GPS Module
The GPS module communicates via UART or USB. Connect it to the GPIO pins on the Raspberry Pi or through a USB-to-serial adopter.

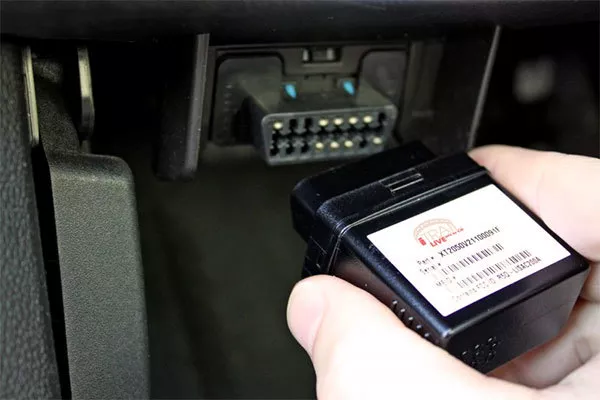
Step 3: Pair the Bluetooth OBD-II Device
Plug the OBD-II device into your car’s port and pair it with the Raspberry Pi using Bluetooth settings.
4. Installing the Software
- Prepare Raspberry Pi OS:
- Flash the OS onto the SD card using tools like Balena Etcher.
- Enable SSH and Wi-Fi during the setup.
2 . Install Python and Dependencies:
sudo apt update && sudo apt upgrade sudo apt install python3 python3-pip qtcreator gpsd gpsd-clients pip3 install pyserial PyQt5 requests3. Setup Google Maps API:
- Create a Google Cloud project and enable the Maps JavaScript API.
- Obtain your API key.
5. Integrating GPS and OBD-II
GPS Integration
Use gpsd to fetch live GPS data.
Python Code for GPS:
#libarary_gps.py
import gps
session = gps.gps()
session.stream(gps.WATCH_ENABLE | gps.WATCH_NEWSTYLE)
while True:
    report = session.next()
    if report['class'] == 'TPV':
        print(f"lon: {getattr(report, 'lat', 'N/A')}, lat: {getattr(report, 'lon', 'N/A')}")
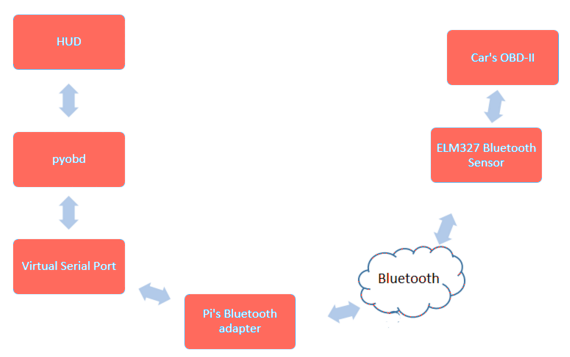
OBD-II Integration with PyOBD
Pair the Bluetooth OBD-II device and use PyOBD to fetch data.
Python Code for OBD-II:
import obd
connection = obd.OBD()  # auto-connects to the first available device
cmd = obd.commands.RPM  # select an OBD-II command (RPM)
response = connection.query(cmd)
print(f"RPM : {response.value}")
print(f"SPEED : {response.value}")
print(f"ENGINE_LOAD : {response.value}")
6. Developing the Python Backend with PyOBD
Combine GPS and OBD-II data into a single Python application that streams real-time vehicle telemetry.
Sample Code Snippet:
import threading
import gps
import obd
# GPS thread
def gps_thread():
    session = gps.gps()
    session.stream(gps.WATCH_ENABLE | gps.WATCH_NEWSTYLE)
    while True:
        report = session.next()
        if report['class'] == 'TPV':
            print(f"GPS: {getattr(report, 'lat', 'N/A')}, {getattr(report, 'lon', 'N/A')}")
# OBD-II thread
def obd_thread():
    connection = obd.OBD()
    while True:
        speed = connection.query(obd.commands.SPEED)
        print(f"Speed: {speed.value}")
# Start threads
threading.Thread(target=gps_thread).start()
threading.Thread(target=obd_thread).start()
7. Creating the UI with Qt/QML
Design a clean and modern interface using Qt Creator.
Example UI Features:
- Live Navigation: Embedded Google Maps view.
- Car Data Display: Speed, RPM, engine temperature.
- Traffic Status: Overlay real-time traffic.
8. Google Maps Integration
Embed Google Maps into your Qt application using QWebEngine.
Code Snippet for Google Maps:
import QtQuick 2.15
import QtWebEngine 1.15import QtQuick 2.15
import QtQuick.Controls 2.15
import QtLocation 5.15
ApplicationWindow {
    visible: true
    width: 800
    height: 480
    Rectangle {
        anchors.fill: parent
        color: "#1e1e1e"
        Map {
            id: map
            anchors.fill: parent
            plugin: Plugin {
                name: "googlemaps"
                parameters: [
                    PluginParameter { name: "googlemaps.key"; value: "YOUR_API_KEY" }
                ]
            }
        }
        Column {
            anchors { bottom: parent.bottom; left: parent.left; right: parent.right }
            spacing: 10
            Text {
                id: rpmDisplay
                color: "white"
                font.pixelSize: 20
                text: "RPM: "
            }
            Text {
                id: speedDisplay
                color: "white"
                font.pixelSize: 20
                text: "Speed: "
            }
            Text {
                id: loadDisplay
                color: "white"
                font.pixelSize: 20
                text: "Load: "
            }
        }
    }
}
9. Testing and Debugging
- Testing GPS Accuracy: Verify GPS coordinates with online maps.
- OBD-II Testing: Cross-check values with another OBD-II reader.
- UI Debugging: Use Qt Creator’s built-in debugger.
10. Final Thoughts and Enhancements
This project demonstrates the integration of various hardware and software components into a cohesive car dashboard system. Future enhancements could include:
- Voice commands for hands-free operation.
- Integration with cloud platforms for data storage.
- Advanced analytics like fuel efficiency tracking.
11. Conclusion
Building this system is a rewarding project that enhances your car’s capabilities while deepening your understanding of embedded systems and IoT.